Managing the symbology of a vector layer, or simply put – changing the style/appearance of the data – is one of the basic tasks in GIS. This is done through the Symbology Manager.
Default Style and User Style
In the System, each Layer has its own:
- Default Style (assigned by the Administrator) and
- User Style (the style set by the User in a specific Map Composition), which is visible only to that User.
The Administrator has the ability to set the Default Style, which will be the primary style for the Layer for all Users. The Administrator can do this:
- by changing the style in the Administrative Panel
- by changing the style in the Map Panel and saving it as the Default Style (Ellipsis > Save as Default Style)
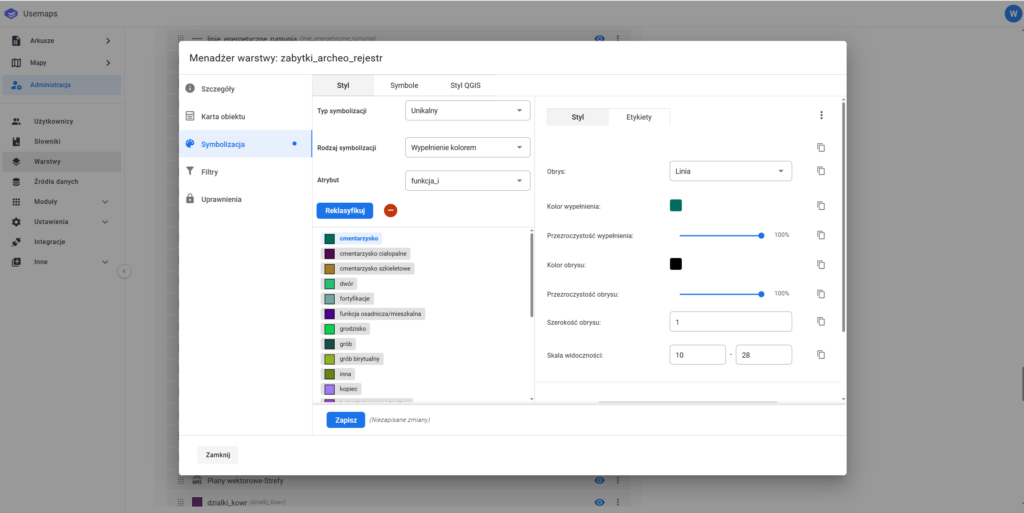
Symbology Manager Description
- Style Tab
- Left section – here we select the symbology type and set its parameters
- Right section – here we set the basic settings depending on the geometry type (point, line, or polygon)
- Labeling Management
- Additionally, we can export and import styles.
- Symbols Tab – this contains a library of SVG or PNG symbols that can be used for point symbology. Tools:
- Import Icon – this tool allows importing an icon in SVG or PNG format (size 64x64px)
- Delete Icon from the library (hovering over the icon in the top right corner will show a cross allowing you to remove the icon.)
- QGIS Style Tab – available only when the QGIS Plugin module is active.
The Symbology Manager is accessible from several locations within the System.
- Administration >Layers
2. Map > Layer List
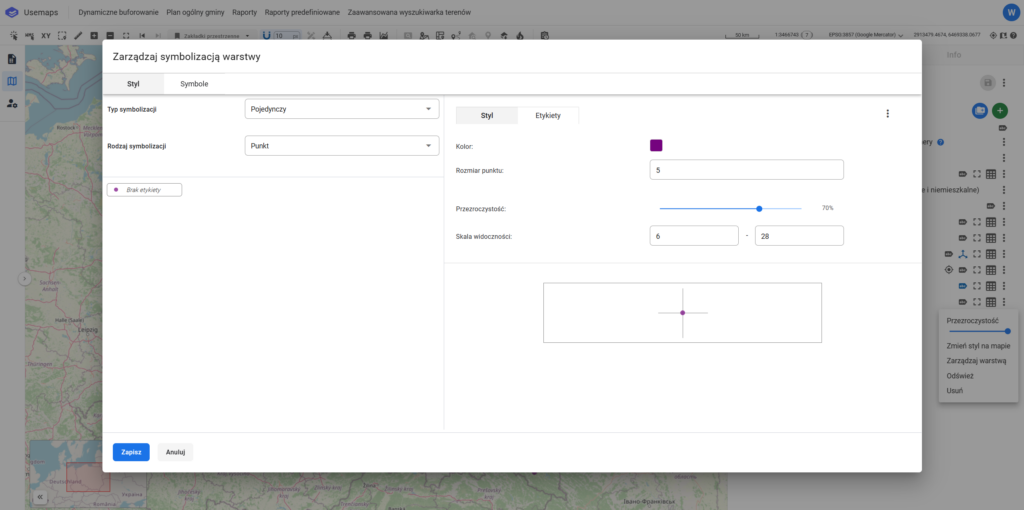
Symbology Options
- Point Layer
- Symbology Type: Point
- Color
- Size
- Transparency
- Visibility Scale
- Symbology Type: Marker (SVG)
- Select an icon/marker from the predefined set
- Icon/Marker Size
- Transparency
- Visibility Scale
- Symbology Type: Point
- Line Layer
- Line Style (solid, dotted, dashed, dense dashed, dash-dot).
- Line Color (full RGB palette available)
- Transparency (0 to 100%)
- Line Width in Points
- Define the visibility scale,
- Polygon Layer
- Outline (solid, dotted, dashed, dense dashed, dash-dot)
- Fill Color
- Fill Transparency
- Outline Color
- Outline Transparency
- Outline Width
- Visibility Scale
Use Cases
- Setting a Single Style
- Setting a Unique Style
- Setting a Graduated Style
- Setting Object Label Style
- Save Style to File
- Import Style from File
- Managing the Marker Library
- Managing QGIS Styles (the Administrator can add a style in *.qgs format [exported from QGIS Desktop]). This will be the style Users see when loading data into QGIS via the Plugin.